Thursday, December 30, 2021

Snow Buddies!


We are drawing to a close for the Holiday Mini Catalog on January 3!  OH MY!  A lot of really awesome items will soon be gone.  But of course there will be some really awesome NEW items!  I'll be having a Facebook Live on January 4 in my special Facebook Group to kick-off all of the fun!  I hope you can join me:  Facebook Live New Catalog Kick-off Party  Here is a video of a demo using the very cute and soon to be retired set called Snowbody Better #156446.  It also happens to be on sale!  Wahoo!  Don't miss this cute gem!


Be sure to check out the other amazing deals that are in the last chance sale.  There are also some great deals on the clearance page.  


See you next time!

Shana & The Big Dogs


Sunday, December 26, 2021

Surprise! A bonus sale for the end of the year!

 BIG NEW for the next few days!  I am having a special from now until the end of this year haha which is just 5 days away...With every $100 of product purchases (before taxes and shipping) that is placed from now until the end of the year 12/31/2021, you may select an item of your choice up to $20 from the new Mini Catalog!  After you place your order, you can send me an email at yarnsundae@gmail.com with your selection up to $20!   You may have received a copy of the new catalog already if you were on my mailing list.   If you didn't get a copy, you can view the catalog online on January 4 to select or let me know if you would like one and I'd be happy to send you one.  I'll send the item of your choice to you separately on January 4. 

Be sure to check out the Clearance Corner and the Last Chance Sale while shopping for your $100 order.  Also be sure to add one or five Wink of Stella Glitter Pens to your order because everyone needs this tool!  
Here is a shopping link:
https://www.stampinup.com?hostcode=EH9XCGE6
Don't forget, you can also get this bonus, too:
My extra bonus for shopping in the month of December with all $50 and up orders is a pack of Gold Holly Leaves or a 6" x 6" Mystery Pack of Designer Series Paper!  (I'll ship these to you directly after you place an order.)


I'm also having a fun Facebook Live night on January 4th in my special Facebook Group:
Party Group for the New Mini Catalog
Just tell me that I sent you!

Have fun shopping!

See you next time!

Shana & the Big Dogs

Friday, December 17, 2021

Sneak Peek at new Mini Catalog Products!

Hi, Friends!  Today I was busy doing Christmas stuff, you know, the baking, wrapping, the this and the that, and I thought BREAK TIME!  I've been dying to share these cards in my quick little video of new Sale-abration items!  

       Enjoy! 


Items used:
Encircled in Beauty Dies 155546
Friendly Hello Stamp Set (available January 4) 158075
Friendly Hello Designer Series Paper (available January 4) 158125
Encircled in Warmth Stamp Set 156449 (retiring soon!)
Wink of Stella 141897
Shaded Spruce Ink 147088
Blushing Bride Ink 147100
Pool Party Ink 147107
Daffodil Delight Ink 147094
Memento Tuxedo Black 132708
Black & White Gingham Ribbon 156485
Biggest Wish Stamp Set 155052
Cardstock:
Pool Party 122924
Petal Pink 146985 (oops I called it Pale Pink)
Basic Black 121045
Scalloped Contours Dies 155560
Real Red 102482
The Designer Series Paper Peaceful Place has sold out now (featured on the Warm Christmas Wishes Card with snowflakes)
Dark Poppy Parade Stampin' Blend 154958


   Hope your Christmas activities are going well!  


    See you next time!

    Shana & The Big Dogs

Monday, December 6, 2021

Snowy Birthdays

 Do you have a winter birthday or know someone who does?  I have two people in my family who have birthdays in December and they kind of get ripped off with the Holidays being front and center for a lot of people.  

Today I wanted to share my little snowman friend who is having a birthday and is having a darn fine time of it, too!  He is from the Snowman Season Stamp Set.


I started out with a Basic White piece of cardstock measuring 8 1/2" x 5 1/2", scoring at 4 1/4".  To that, since it's a party, I took a 5 1/4" x 4" piece of Pool Party cardstock and stamped some snowflakes and snowballs for a light background using Pool Party ink.  The next layer was a piece of Basic White measuring 5" x 3-3/4". I ran it through my Stampin' Cut and Emboss machine using the Bark 3D Embossing Folder.  Then I used the 3rd up from the smallest size of the Layering Diorama dies for a little window.  

Because I love sparkles so much, I had to add the White Glitter Organza Ribbon under two scalloped ovals that I had punched out with the Double Oval Punch using Basic White and a scrap piece of Sweet Stockings Designer Series Paper.  

I found the cutest sentiment in a set called All Squared Away.  I used a little bit darker ink in Bermuda Bay for this.  The font is so cute!  Can you see the little holiday rhinestone on the right side?  These are my absolute favorite embellishments!  

Then it was time for the Birthday Boy himself!  I stamped our little friend on a scrap of Basic White using Memento Tuxedo Black ink.  


Now you know what I'm going to say next, right??  

Of course, I grabbed my Wink of Stella Glitter Brush and used Pool Party Ink and Pumpkin Pie to add some colorful sparkly magic to the little guy.  I just can't stop using that technique!  

I popped the snowman up with Dimensionals along with the white scallop piece with the sentiment.  

We had a good time today!

You can find all of the items that I used on My Project Page on my website.   

I hope you liked making a Birthday card during a pretty holiday kind of month!

See you next time!

Shana & The Big Dogs


Tuesday, November 16, 2021

Coloring with Wink of Stella Glitter Brush

My stars!  Who knew how much fun this is?  I was watching another Stampin' Up! demonstrator working on a card and low and behold she used her Wink of Stella Glitter Brush in her ink and WOW!  It was just so brilliant.  I couldn't wait to try this out and well, I just keep doing it.  I just placed an order in the Black Friday Seasonal Sale today for paper, ink, and a couple of dies that are on sale and I thought I'd better get another!  Here you can watch as I color the little tree that appears in my previous blog post.  


Links for everything are in the comments of my video!  Please share with me what you color with Wink of Stella.  It is the GREATEST!

See you next time!

Shana & the Big Dogs!


Sunday, November 14, 2021

Merry Everything!

 Merry Everything!  That covers it!  

Here is a fun little card that warms my heart.  I love the simplicity of it.  It also makes me think of Charlie Brown and his little tree.  This time of year when the Peanuts shows roll around is one I look forward to.  


In making this card I started out with Cherry Cobbler cardstock measuring 8 1/2" x 5 1/2, scored at 4 1/4".  Then I cut a piece of Basic White cardstock 5 1/4" x 4" and then ran it through my Stampin' Up! Cut & Emboss Machine using the Brick & Mortar 3D Embossing Folder (149643).  

I learned a fun thing to do with Stampin' Up!'s Wink of Stella Glitter Brush!  Use it with a bit of ink from the lid of your stamp pad and then the color sparkles!  I used this technique on the bricks with Smoky Slate ink.  If you've never done that, here's what you do!  Take your Stampin' Pad and turn it upside down so the label is facing down.  Then squeeze with your thumbs on the bottom.  When you open up the pad, you will see ink on the inside of the lid in a little pool.  Here is where you can take the ink with the Wink of Stella Brush.  A little ink goes a long way.  When done with one color, just use a scrap piece of paper to write on to clear the brush.  

I stamped the Merry Everything sentiment from the Merry Snowflakes Stamp Set (156419) and then the Seasons of Fun (156576) little tree image minus the little child in Memento Tuxedo Black.  

The sentiment piece on Basic White measured 1" x 4" and then I used the Lovely Lables Pick Your Punch (152883) for the ends.

The little Santa Hat from Sweet Little Stockings Stamp Set (156419) was next.  After stamping, I used the die from the coordinating set Stockings Dies (156288) to cut out the hat.  

The little tree was just begging for sparkles so I used the coloring technique with Wink of Stella again with Cherry Cobbler for the sled, Smoky Slate for the ground area, Cinnamon Cider for the bag, Evening Evergreen for the branches, and my most favorite next to Cherry Cobbler color, Pale Papaya for the star.  

Just an FYI, there is a big sale starting on Tuesday, November 16, 2021 that runs through Wednesday, November 18, 2021 for cardstock, ink, and dies...perfect for this and more projects!  


After coloring, I fussy cut the tree out.  Then I cut about 22" of the Black Gingham Ribbon.  I was debating if I would color it with Cherry Cobbler Stampin' Blends but then I remembered I don't have that color (adding to my list now).  So I just left it white.  But the ribbon looks great in different colors of Stampin' Blends.  

I taped one end of the ribbon to the back of the embossed bricks and then wrapped around this about 3 times.  I placed Mini Glue Dots behind the ribbon as I wrapped to keep it in place.  Another piece of tape secured it to the back.  The label went on at an angle with Stampin' Dimensionals, finished off with the Santa Hat with dimensionals - I also colored the hat with Wink of Stella and Cherry Cobbler.  I am addicted now to doing this.  Uh Oh!  The little tree was attached with Mini Stampin' Dimensionals and the last step was to add the beautiful red Holiday Rhinestone Basic Jewels (150457).  I would like to add these to my outfits each day!  So sparkly!  

That was a super fun card to make.  I hope you like it!


You can see all of the items used on My Projects page on my website along with shopping for anything else that you might need.  My Projects Page

Shopping Link

OH!  Don't forget...right now there is the hugest discount on getting a starter kit that you just can't pass up!  You can get $125 of Amazing Stampin' Up! products for only $75!!  This runs through November!  Here is a link:

Join my team, Have fun, and gets lots of awesome products!


See you next time!


Shana and the Big Dogs

Wednesday, October 20, 2021

Bottle Tags

 I almost titled this post as Wine Bottle Tags, but then I thought, wait!  There are so many bottles that could be decorated...lol.  There's no limit!

I recently received my kit, Love Santa (158375) which is available any time while quantities last in my online shop.  This kit is designed to have you create many cute tags for the holidays.  When the kit arrived, I immediately wanted to make some other things first.  Gee whiz, already off topic!  

To start things off, I measured a piece of Mint Macaroon Cardstock 8 1/4" x 2" with a score at about 2" from one end.  I used a little circle die cut that was from the Frightful Tags Die Set for the wine bottle to fit.  Then I took a slip of leftover Designer Series Paper from Whimsical Trees and cut it slightly smaller than the tag.  There was a tiny bit of DSP paper left, so I cut a tag from Tailor Made Tags that would allow my sentiment to fit.  I planned on using the non-sparkly/tree side.  

From the Love Santa kit, I took the big Christmas Tree and punched it out.  I cut off the top circle tag part and glued it at an angle on my bottle tag. I then placed some embellishments from the kit randomly on the tree because SPARKLEY!!  Then I stamped the sentiment Merry and bright from the stamps included in the kit onto the trio tag.  I used the red and white twine included to tie a bow on the tag and then glued it at a slight angle to the bottle tag.  

TA-DA!  A bottle now has clothes, just like Hermione making clothes for the elves in Harry Potter.  Well, it's a stretch.  

Just thing, you could make tags to decorate soaps, body wash, mini bottles, soda bottles, water bottles (don't give that as a gift, I mean really, or do because it's the thought that counts, right?) or whatever you can think of!  

Have fun and share your ideas with me on my Facebook Page!

You can find all of the items that I used to make this tag under My Projects on my website at:

My Projects Page

Enjoy!

See you next time!

Shana & The Big Dogs

Monday, September 27, 2021

Mystery Stamping Results

Spoiler Alert:

Here you will find what I made from reading the Mystery Stamping Clues from my previous post, along with the card Barb made who is the author of the clues.  

Mystery Stamping is so much fun!  There's no right or wrong answer.  You just get going and Bam, there's a cool card!


This is mine.


Here is the inspiration by Barb lol!  What a difference in reading directions.  Mostly I envisioned a door with little friends peeking out.  You can't see it super well but the embossed gray background has Wink of Stella on it to add some sparkle!


See you next time!

Shana & The Big Dogs 


Mystery Stamping Challenge

This past weekend, the team that I am on for Stampin' Up had an awesome StampinPalooza Fall Virtual Retreat event set up by 3 friends who have such fun ideas and are so creative!  There were card making challenges, swaps, mystery stamping, guest speakers, and even a super fun scavenger hunt.  It was so fun!  I am amazed at how much stuff can be done virtually and how cool it can be.  There were people joining in from all over the United States and some of the guest presenters were from England.  

For the Mystery Stampin' Challenge, here were the clues:

Mystery Stamping Clue #1:
Gather Your Supplies:
Stamp set with small images and sentiments (can be two different sets)
Three colors of cardstock plus neutrals that coordinate together.
Coordinating Ribbon and Embellishments of your choice
Embossing Folder
Ink
Adhesives

Mystery Stamping: Clue #2:
Cut your cardstock layers
Cardstock base (can be colored or neutral): 5 1/2" x 8 1/2"
Cardstock embossed: 4" x 5 1/4"
Cardstock: 2 3/4" x 4"
Cardstock: 1 5/8" x 2 1/2"
Cardstock: 1 3/8" x 2"
Cardstock: 1" x 2"
Ribbon: enough to wrap around embossed layer

Mystery Stamping Clue #3:
Wrap ribbon around embossed layer and tie in a bow near the edge, add to card base.
Stamp images/sentiment on three small cardstock layers, arrange and adhere pieces to the 2 3/4" x 4" layer.
Add layer to card with dimensionals.
Add embellishment as desired.

Enjoy!

Give it a go!  I'll share my card and the original card by Barb Mullikin in another post so you can have it as a mystery.  

Can't wait to see what you make!

See you next time!

Shana & The Big Dogs


Monday, September 13, 2021

Pink & Black Glittery Happy Birthday Card

 My friend, Debbie, sent me the coolest card with that she made with the Hat Builders Die Set!  It inspired me to get out my set and make one.  I had been thinking of using my new pack of Black Glittery paper because I own black glittery hats!  Here is what I came up with:


I loved using my Blending Brushes on the embossed piece behind the hat!  I think my friend created a monster.  I want to ink all of my embossed things now!  

If you'd like to make you own, here are some quick instructions (I have a pattern or recipe available to print out in my Facebook VIP group at https://www.facebook.com/groups/260027202503842 (you may have to like my Page to be able to be in the group first...it's always something, isn't it?)  

I started with a card base measuring 8 1/2" x 5 1/2" in Basic Black with a score at 4 1/4".  I then added the Star Crossed Embossing piece on Basic White and used my Blending Brushes to make it fabulous with Polished Pink ink.  The silver circle is made from the Encircled in Beauty Die Set and the very cool Silver Foil pack.  The sentiment is from the Sweet Ice Cream Stamp Set and the ribbon is the Open Weave Polished Pink.  I have all of the items that I used on my shopping website link at My Projects.  Be sure to check out my other projects as well.  If you have any questions about any of my projects, just let me know!


Here's the inside of the card:


Thank you so much!

See you next time!

Shana & The Big Dogs


Saturday, August 28, 2021

September is falling upon us!


September is almost here!  Fall-a-palooza!  

Thinking of YOU!  What are your crafting plans for this Fall?

Yes, we are entering Fall-a-palooza!  I'm sure it's a National Thing!  Also we are celebrating the last month of Sale-abration!  You have just one more month to take advantage of all of the FREE stuff!  Don't forget about the Join Special which is huge for Sale-abration!  You can get an entire bundle for FREE!  (Be sure to check out the big list you can choose from on page 19 of the Sale-abration flyer or just ask me.  It's a heck of a deal!)  A link to join the team is listed below by the Scooby Doo Mystery Machine lol.


What is Sale-abration exactly?  What are all of the free things you ask?  Check out this neat video from Stampin' Up!'s home office to hear about the FREE stuff (I've heard from a few of you that the Be Dazzling paper is tops for the FREE stuff...what do YOU say?):
https://youtu.be/4U_MK9XVvFI

Here is a cool video showing how the FREE Sale-abration stamp set Feels Like Home was made (I feel like we are going on a field trip!  We lived in Utah for a few years.  I love thinking about the fun times we had as I'm stamping with cool stuff from there):
https://youtu.be/DKeKHbd6pZA


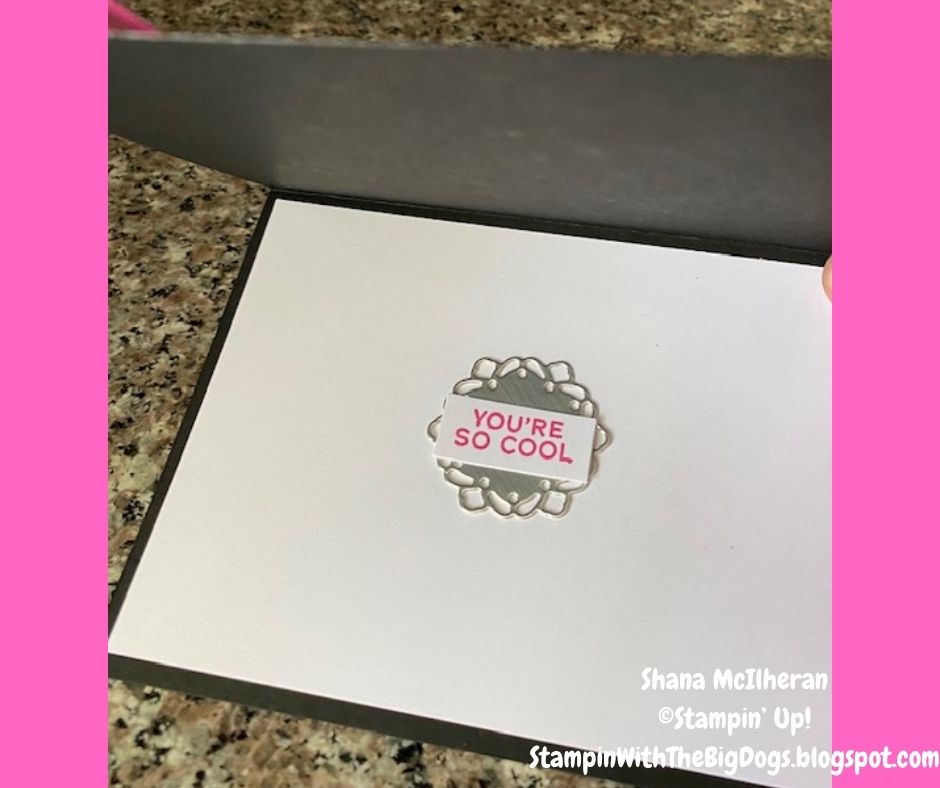
 Here are some neat projects made with the set.

The August Special is going to keep going into September!
What is better than building up your Stampin' Pad collection?  Not too much!  So for this month again, with every $50 order in my Stampin' Up! store, you can pick either your choice of Stampin' Pad or a Mystery Pack of 6"x 6" Designer Series Paper as a thank you for supporting my small business!  After a product order of $50 (or increments of), I'll email you to find out your choice and send those to you.  Hooray! I'll ship those to you after your order is placed.
So remember, with every $50 of product placed, you will receive one FREE item...so $100 you may select 2 and so on.  

Here is the link to my Stampin' Up! shop, including my new September Workshop code (this is active now for the last few days of August):
https://www.stampinup.com?hostcode=6H3QXN7F
(if just entering the code itself, it is:  6H3QXN7F)


Other Fun Stuff!

Fall Card making recipes:
Here are a couple of recipes for some fun fall cards from the Mini Holiday Catalog:


The next Paper Pumpkin Subscription Box is available for ordering...just look at the beautiful picture above!  These boxes are so fun!  Give it a try!  You'll receive all you need to make cool cards or gifties and after you make the items in the box, you'll still have the tools to use any which way you want!  Be sure to sign up to get this one by September 10!  Here is the link to get your Haunts and Harvest:
http://www.paperpumpkin.com/en-us/sign-up/?demoid=2249113


World Card Making Day!  
Mark your calendars because October 2, 2021 is the day!  What could be better than to get together with friends to craft some awesome cards, share ideas, and inspire each other?  Let's do it!  In-person or virtual, sounds fun!


I wonder if you might help me?  I am looking to grow my business and need some help finding crafty people.  Do you know any that you might share my info with?  I'd be so grateful!


Don't miss out on the other great things happening...


JOIN MY TEAM! 

There isn't a better time to join The FUN BUS with me than during Sale-abration!  You will be able to select a FREE BUNDLE of your choice along with your Starter Kit products!  So, if you want a discount for the very busy fun fall and winter crafting season, don't miss out!  August is the time to do it!  Remember that you do not have to do any demonstrations; you can be part of Stampin' Up! for the discount.  I joined during the last Sale-abration and was able to get so much FREE STUFF.  Hey, I'm all about the FREE STUFF...lol.
I'm looking for some fun people to hang out with me!  I am part of a group called We'll Ink On It with Barb Mullikan who is teamed up with Dena Rekow and Kelly Acheson.  As part of my team, you will also be able to participate in this group of amazing Stampin' Up! activities such as Retreats, Catalog Kick-offs, and just all around fun nights!  I saw Barb stamping on Youtube and knew I wanted to join her fun group!  My team name is Shana & The Fun Folds!  (like Josie & the Pussycats, right??  haha)
Here's my link to join:
 https://www.stampinup.com/join?demoid=2249113
You get to pick out items for your starter kit which will value $125.  You pay $99 and get FREE SHIPPING!  Many people join just for the discount and are hobby demonstrators, meaning they just are here for the discount.  Some pursue it as a business as I am doing.  I'd love to have you join me! 


LET'S HAVE SOME FUN!

Please check your calendar and to see if I could put you down for your own awesome adventure workshop!
HOST YOUR OWN WORKSHOP!!  
I've come up with some fun ideas for us to get together and have you earn FREE rewards with different types of workshops.  Which one do you like?

   
A bunch of friends get together to have fun crafting along with earning points for things during the workshop.  The one with the most points gets to be the Host and have the Rewards!

  
Bingo is a fun night of card demos and Bingo games with fun prizes while hanging out with your friends!


You say you don't have much time?  Okay, I'll demo a real quick and easy card and show you just a few things that are fun in 30 minutes!  You bring your friends and I'll bring the fun!


New to papercrafting?  This is the perfect choice for you!  We'll work on your favorite kit together virtually or if we can, in person!

  
The traditional virtual workshop that can last one day or many, whichever you prefer!  Just invite your friends and away we go!

  
Want to do a traditional paper copy of the catalog or a digital copy that you'll share with friends and collect orders to earn rewards?  Can do!  Just let me know how many you need or if you want to send everything digitally to your friends...got it covered!  What an age we live in!


Not sure yet about being a Host?  Join my VIP Facebook Group!  https://www.facebook.com/groups/260027202503842 or visit my page at https://www.facebook.com/StampinUpwithShanaMac.  I share fun things for you to see along with activities in the VIP group.


CHECK IT OUT:
On my Stampin' Up website (shanamcilheran.stampinup.net), there is a Project tab available now to see cards that I have made and shared on Facebook and my blog.  I am also able to list all of the available materials that I have used so that you will know exactly what to get if you would like to recreate them.  I think it is a pretty neat feature and I am enjoying adding to it. 

A quick note and I wonder if you made it to the end of this lol:  I am moving!  Hopefully as September ends I will be getting close to our new place which is located in Seymour, WI.  Yes, the Home of the Hamburger haha!  We have had a super fun time here in Central Illinois!  I've met so many awesome friends that I hope to have forever!  I'm very thankful for technology which keeps us linked closer.  


Thank you so much for being my customer and more importantly, my friend!  

Shana McIlheran

Independent Stampin’ Up Demonstrator


Some helpful links:

My Shop:  shanamcilheran.stampinup.net

Blog:  StampinWithTheBigDogs.blogspot.com
Facebook Page:  Shana Mac Stampin’ Up
Paper Pumpkin Kits Order Link:
http://www.paperpumpkin.com/en-us/sign-up/?demoid=2249113

YouTube:  https://www.youtube.com/channel/UCFsglw2giHVmJC8CuHzAQ-Q


Thursday, August 5, 2021

Holiday Catalog Kick-off and the Cutest Halloween Bundle!

Today was a fun day made for punching out pumpkins!  Please check out my short video on this cute little card using the Cutest Halloween Bundle (156483) from the new Stampin' Up! Mini Holiday Catalog that just began a couple of days ago!  

Here is the finished product!  I made a standard sized card with Basic Black cardstock.  I used the Stampin' Cut & Emboss folder Checks & Dots on a slightly smaller piece of Pumpkin Pie cardstock.  The candy corn images and the sentiment are from the Cutest Halloween stamp set.  The label for the sentiment was made using Frightful Tags die set.  There is a tiny piece of Black Glittered Organdy Ribbon under the label and there are also 3 In-color gems on the label.  I almost forgot...I embossed the label with the Dots folder also!  The black dots are from the Cute Halloween Designer Series Paper and was cut with the edge die from Scalloped Contour Die Set.  The cute little pumpkins were so much fun to make with the punch from the Cutest Halloween Bundle along with the actual stamping...the FACE is just so cute!  I popped these up on dimensionals along with the sentiment.  I hope you like it and it inspires you to get going on fun projects for the fall.  


I will have all of the products that I used for this card listed on My Projects page of my website for easy selection if you'd like to make a similar card.  My Projects

Last night I held my Holiday Catalog Kick-off on Facebook!  It was so much fun sharing the new products.  Please take a look at my video here:


Let me know if you have any questions!  

See you next time!

Shana & The Big Dogs


Saturday, July 31, 2021

Giving Thanks - Prepping for the new Holiday Catalog starting on Tuesday!

 I am THANKFUL...for so many things, but let's talk the new Holiday Catalog lol!  This coming Tuesday, August 3 the new catalog along with Sale-abration goes live!  As a demonstrator I've been able to pre-order items throughout the whole month of July and get to show you some of them in the next few days.  

My live event will be on my Facebook Event Page: Holiday Catalog Kick-off.  Everyone who attends will have their name entered into a drawing for a gift from me!  Hope to see you!

Let's get started with a couple of cards that I made:


This is a favorite with the beautiful Sale-abration Specialty Paper (156629) Be Dazzling that you can get for FREE with a $50 order starting on August 3.  I die cut pumpkins from the Detailed Pumpkin die set (156477) that comes in a bundle with the Pretty Pumpkins Stamp Set (156472).  I used a standard card base with Merry Merlot (146979).  I then used the Bark 3D embossing folder (155431) on a slightly smaller piece of Merry Merlot.  The sentiment is from the new Time of Giving stamp set (156509) stamped with Early Espresso ink pad (147114) on a small strip of Pale Papaya cardstock (155668).  This was placed on a die label cut from the Meadow Dies set (155852) cut from a scrap piece of Early Espresso cardstock (119686).  I cut a small piece of Soft Succulent Open Weave Ribbon (155780) in half and put this through the label.  I also cut some flower pieces in Evening Evergreen and Pale Papaya (155641).  These were glued to the extra piece of Merry Merlot and then the sentiment was placed over that with dimensionals.  The pumpkins were glued with glue dots on the two side pumpkins and dimensionals were used for the center pumpkin.  I love these colors combined together so much!  

My next card done was with a standard card base of Evening Evergreen (155574) and a piece of Designer Series Paper Bloom Where You're Planted (155696).  On a side note, today is the last day of the DSP sale.  Behind the piece of DSP, I placed the leftover Be Dazzling scrap that I had cut the pumpkins out of for the first card, as a border.  Then on the actual DSP I used a Versa Mark Stamp for the pumpkins and the sentiment from the Stamp Set from above, Pretty Pumpkins.  I then used gold embossing powder and used my heat gun to make it shiny.  I love the shiny!


There are so many great sets to see!  Can't wait to show you and tell you all about the great specials available!  If you want to save a lot, consider joining my team when Sale-abration starts.  Not only will you receive $125 of product that you get to pick for $99 but you will also be able to select from a list of new bundles, a set for FREE.  You will then be able to always shop at a discount as a Stampin' Up! Discount Demonstrator or pursue this as a business.  There's no better time to join! 


  Join My Team, Shana & The Fun Folds!

See you later with some more great new stuff!

Shana & The Big Dogs


Saturday, July 24, 2021

Thank You's & Sympathy Cards

This week's cards needed were some Thank You's and a Sympathy Card (which are never any fun to make at all).  

Embossing Folders popped right into my head to use as I've really been enjoying cards that have the same color backgrounds as the fronts.  


I also wanted to try and make some that maybe a guy could give out.  My husband said he'd really feel a little funny handing out a Thank You with tons of flowers or "girlie" things on it.  Okay, so this is what I came up with.  I hope stars aren't too "girlie" lol.  

I started with Basic White Cardstock (159276) cut to a 5 1/2" x 4 1/4" base.  For the first card I used the Stampin' Cut & Emboss Star-crossed Embossing Folder (156567) which happens to be in the new Mini Holiday Catalog on a piece of Basic White Cardstock measuring 5 1/4" x 4".  The sentiment Thank You is from the Sweet Ice Cream Stamp Set (154456) and the label it is on is the smallest rectangle from the Scalloped Contours Die Set (155560) using black ink.  


The second Thank You card uses the Thank You folder from the Thanks & Hello Embossing Folder (155430) with the same measurements as above.  The Thanks sentiment is from the Biggest Wish Stamp Set (155052) and was placed on one part of the 2 part Double Oval Punch (154242).  

These Thank You's could come from anyone, I think.  


Sympathy Cards are the worst to have to make.  When needed, I like to really concentrate on sending helping, healing thought to the recipient.  For this card I used the very beautiful Dandelions 3D Embossing Folder (152953).  There is just something about this set that brings peace to my mind.  The Pale Papaya Cardstock (155668) adds just the right amount of warmth along with the sentiment (happens to be a retired one) and the Open Weave Soft Succulent Ribbon (155780) adds some softness.  The ink color is Evening Evergreen (155576) which brings a soulful feel to the card.  I think Pale Papaya and Evening Evergreen pair up so well together!


I hope that these might help you create some cards this week!  You can see all of the items I used to make these cards on my Stampin' Up! website at:  My Projects Page

We are just a week and a half away from the start of our new Mini Holiday Catalog!  If you're a current customer of mine, I hope you have received your copy to look through in advance.  If you'd like a catalog, please let me know.  My kick-off event will be August 3, 2021 at 6:30 pm on my Facebook page.  I'll be sharing some of the new products and would love to have you join me!  Sale-abration also begins on this day which means FREE stuff!  Can't wait!

See you next time!

Shana & The Big Dogs


Thursday, July 22, 2021

Calendar of Events

We are getting close to having our new Mini Holiday Catalog and Sale-abration  go LIVE!  August 3 is the day!  I'm so excited!  If you're already my customer, you most likely will have received your catalogs from me or will shortly.  If you'd like to have one, just let me know and I can send you the goodies!  

With this fun new catalog and Sale-abration starting, it is a great time to consider doing a workshop to take advantage of all of the perks and rewards available.  Sale-abration is the time when Stampin' Up! gives us all more perks!  For example, with every $50 product you order, you are able to select a free stamp set!  WHATT!  Also it is the perfect time to consider taking advantage of the Join special to become a discount shopper or work on a business for yourself.  With Sale-abration, you are going to get $125 worth of product for $99 and FREE SHIPPING ANDDDDD you get to select a FREE bundle along with that!  So if you find your wishlist growing and growing, why not get a discount and perks!  Let me know if you have more questions.  Getting a sale on something is one of my favorite goals in life.  lol

With all this said, please take a look at my calendar and can you help me fill up the days with workshops?  I can do a lot of stuff virtually as well as if you are local to me, we can get together.  Click on the picture below and it will take you to my website calendar:


I'm so excited to start talking FALL!  This hot sweaty stuff is gross.  haha

See you next time!

Shana & The Big Dogs

Thursday, July 15, 2021

Designer Series Paper Card Challenge

Today my team had a Designer Series Paper Card Challenge because there is a sale on some right now for 15% through the end of the month.  


I chose to use Bloom Where You're Planted (#155696).  Our challenge was to cut a piece of DSP 12" x 4 1/4" and to score at 5 1/2" and 11".  Then the 1" fold section would be folded for a standard card size.  

For my card, I die cut plants from the paper along with fussy cutting one that didn't have a die.  I used the Perfect Plants Die Set (#155562).  It's amazing to me that the dies match up exactly with the DSP.  One of the huge strengths of Stampin' Up! is the coordination of everything.  It is unbelievably awesome how they figure this all out.  I added the cat from the Pampered Pets (#152520) and the Pets Die Set (#152705).  For the cat, I used Stampin' Blends to color with Dark Crumb Cake (#144581) and Dark Pale Papaya (#155519).  After using my Stampin' Seal to adhere the 1" flap down, I used Stampin' Dimensionals to place the cat on the bottom of the card.  To the left of her I used my Dimensionals again for my die cut plant.  Above the cat is the plant that I used my scissors to cut out.  Toward the top of the card was another plant that looks like an Aloe Plant but I think it has another name.  This one I just glued down flat. To finish it off, I die cut one of the Taylor Made Tags with the Die Set (#155563) and a sentiment from Dressed to Impress (#158321).  The ink for this was Evening Evergreen (#155576).   I know exactly who I'm giving this card to so it was the perfect sentiment to pick.  To finish it off, I tied a piece of Soft Succulent Open Weave Ribbon (#155780) for the tag and again went for my Dimensionals.   


On the inside of the card I cut a piece of Soft Succulent Cardstock (#155776) 4" x 5 1/4".

The double sided Designer Series Paper proves to be so amazing and really puts no limit on what you can come up with!

It's so fun to see what comes from challenges and how people interpret directions. Which paper would you use?


To find any of the products that I used to make this card, please click here which will take you to My Projects on my website:  My Projects Page

Thanks for checking this out!  

See you next time!

Shana & The Big Dogs


Stampin' In The Studio...Sunday version!

 Hello!  Today I wanted to work with the newest Paper Pumpkin Kit, show you another kit called Cozy & Bright, and share some of my favor...